What areas of work are you considering when college finishes? Do you know what you will have to do to get there?
Apply for a 'staff' job? Launch yourself as a freelance? Take an assistant’s role? Buy a franchise? Move to another city or even another country?
Write 1000 words outlining your photographic career plans and the options you think are open to you.
Nothing is fixed, everything might change - and no-one will make any form of judgement about what you choose, but writing this will help you focus your thoughts.
Explain what you know and/or think you will have to do to get where you want to be. Can you identify the steps you will have to take?
Will you need funding or start-up capital? Further training? Will you seek advice, and if so who from? Is there are an area of business that particularly interests you? Have you seen a gap in the market? Do you have a USP (Unique Selling Point)?
Deadline Monday 2nd June - Lecture theatre 2: 12 noon
Tuesday, April 29, 2008

Graded Unit
Submission of final projects: Monday 12th May Lecture theatre 2 @ 10.00am
We will review all the work
Submission of written evaluation: Monday 19th May Lecture theatre 2 @ 12noon
All projects (proposal, research, pictures and evaluation) need to be package ready for collection. Please do not be late.
We will review all the work
Submission of written evaluation: Monday 19th May Lecture theatre 2 @ 12noon
All projects (proposal, research, pictures and evaluation) need to be package ready for collection. Please do not be late.
Monday, April 28, 2008
Tutorials Tues 6th May
9.15am
9.45am
10.15am Eva
11.00am
11.30am
12noon
Use the comment function to choose a time
9.45am
10.15am Eva
11.00am
11.30am
12noon
Use the comment function to choose a time
Tuesday, April 22, 2008
Tues 29th April - Location Stock
That was a disappointing turnout on Tuesday. Thanks to the one person who turned up and to those who emailed me.
I have given you a lot of freedom on this module but I need to know what progress you are making. Otherwise I get in trouble with your class tutor and I don't like that.
To the rest... I really need you to turn up on Tuesday 29th April, between
1.15 and 3 to show me your work so far and/or discuss any problems or concerns you have.
If you can't make it in can you please drop me a note
(adam@scottishviewpoint.com) and let me know how you are getting on with the module.
Thanks,
Adam
I have given you a lot of freedom on this module but I need to know what progress you are making. Otherwise I get in trouble with your class tutor and I don't like that.
To the rest... I really need you to turn up on Tuesday 29th April, between
1.15 and 3 to show me your work so far and/or discuss any problems or concerns you have.
If you can't make it in can you please drop me a note
(adam@scottishviewpoint.com) and let me know how you are getting on with the module.
Thanks,
Adam
Thursday, April 17, 2008
Location Stock
Can everyone please come in between 1.15 and 3pm on Tuesday 22nd April to show me their Location work so far. If you can't come in can you email me a summary of work so far. (adam@scottishviewpoint.com)
Tuesday, April 15, 2008
Professional matters

When you arrive at the point where you can't face being a criminal any longer, try googling Scottish Enterprise or Business Gateway
They will give you advice on what to do.
You must keep a record of all your purchases - receipts and ideally a separate bank account. (Purchases made prior to you going 'legal' can be used to lower your first year's tax bill.)
Information on Income Tax and National Insurance contributions is here
Tax is calculated on PROFIT not turnover, so get an accountant to look at your books. He or she will save you whatever fee they charge - and more.
Insurances are up to you - equipment, public liability, illness, pension, etc
A good resource for news, jobs, insurers, lawyers (and an annual review of the professional photo vest market) is the printed version of the British Journal of Photography, available in the college library - and also online

Friday, April 11, 2008
Monday 14th April
Lecture theatre 2 at 10.00am
Professional issues: Income Tax, VAT, Banks, Accountants and Pensions
Please think about a tutorial time in the next couple of weeks - I need to see you all individually at some point.
Professional issues: Income Tax, VAT, Banks, Accountants and Pensions
Please think about a tutorial time in the next couple of weeks - I need to see you all individually at some point.
Tuesday, April 8, 2008
Tutorials - Tuesday 15th: Room 187
Please bring along your Graded unit work-in-progress and workbooks
9.15am Vicky
9.45am
10.15am Eilidh
11.00am Esti
11.30am
12noon
Post a comment through the link below to book a slot. I need to see all of you, and will have to dictate times if we can't negotiate.
9.15am Vicky
9.45am
10.15am Eilidh
11.00am Esti
11.30am
12noon
Post a comment through the link below to book a slot. I need to see all of you, and will have to dictate times if we can't negotiate.
Friday, April 4, 2008
Monday 7th April
Lecture theatre 2 @ 10.00am - we will look at 'The Bus' by Daniel Meadows
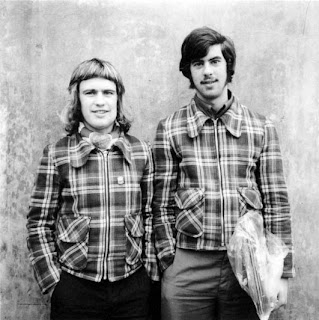
Don't laugh - people still look like this in Australia
Here's Daniel Meadows' official 'Bus project' website. Please take a look - there's a huge amount of information and some great ideas. The project is still very much alive.
French Philosopher Roland Barthes uses two terms to describe photographs:
Studium - is the surface impression of an image - it's technical quality or 'competence'
(Whether the image is ok - not bad - alright)
Punctum - is the wounding, personally touching detail which establishes a direct relationship with the image
(The bit that grabs us)
These concepts first appeared in Barthes's Camera Lucida (published in 1980)
Barthes's influence is greater than you might think, even in commercial design and photography circles
There's even a Punctum group on flickr
So anyway, back to these two muppets... it's the 1970s - they're wearing tartan - they must be Bay City Roller fans...
WRONG!
See the records he's carrying

Well, the top one is Deep Purple (manly Heavy Metal to you) - not cissy pop music for girls.
Before iPods and walkmans, young men used to take records round to their friends' houses to listen to - protected from the weather in a polythene bag.
And the scarf:

...is a Manchester United scarf. One of the few bits of merchandising fans could buy in an age before the commercialism of football started to fleece fans for replica shirts and official socks, underpants, bed linen and matching curtains...
These two young men are wearing tartan jackets to associate themselves with Manchester United and their Scottish manager (at the time...) - Tommy "The Doc" Docherty.
"The 'punctum' for me in this picture (and many of Daniel Meadows 1970s Bus portraits) is how I feel when I see the jackets, and haircuts, and imagine the smell of two young men who only bathed once a fortnight (if that).
I never had a jacket like that - my Mum wouldn't let me - and I would have been frightened if I walked down the street towards 'big kids' like them. They were the sort of lawless hooligans who would "kick yer 'ed in".
Now I see them and smile at how harmless, innocent, naive and comical they really were.
I also feel touched at the sight of the records - and remember that I often used to listen to music intently with friends. We would sit in each others' bedrooms and pore over every inch of the gatefold sleeves, devouring the lyrics and looking for mysterious messages scratched into the run-out groove.
People don't do that anymore.
I don't do that anymore.
But this picture transports me - like falling through a hole in the fabric of time and space, back to an age when things were simple - people ate meat and two veg everyday and knew their neighbours.
The punctum isn't necessarily a flaw, or a hole or a specific item - it best describes our emotional response to images (and perhaps people, music, places, tastes) - not something that everyone shares or understands - but matters indvidually to us.


Don't laugh - people still look like this in Australia
Here's Daniel Meadows' official 'Bus project' website. Please take a look - there's a huge amount of information and some great ideas. The project is still very much alive.
French Philosopher Roland Barthes uses two terms to describe photographs:
Studium - is the surface impression of an image - it's technical quality or 'competence'
(Whether the image is ok - not bad - alright)
Punctum - is the wounding, personally touching detail which establishes a direct relationship with the image
(The bit that grabs us)
These concepts first appeared in Barthes's Camera Lucida (published in 1980)
Barthes's influence is greater than you might think, even in commercial design and photography circles
There's even a Punctum group on flickr
So anyway, back to these two muppets... it's the 1970s - they're wearing tartan - they must be Bay City Roller fans...
WRONG!
See the records he's carrying
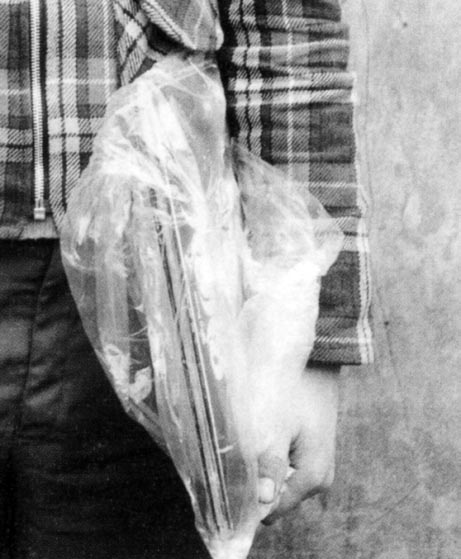
Well, the top one is Deep Purple (manly Heavy Metal to you) - not cissy pop music for girls.
Before iPods and walkmans, young men used to take records round to their friends' houses to listen to - protected from the weather in a polythene bag.
And the scarf:
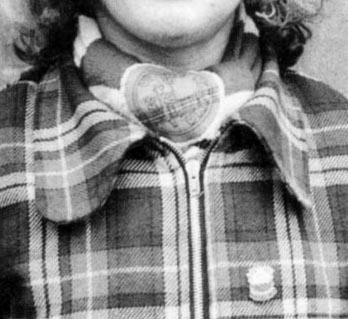
...is a Manchester United scarf. One of the few bits of merchandising fans could buy in an age before the commercialism of football started to fleece fans for replica shirts and official socks, underpants, bed linen and matching curtains...
These two young men are wearing tartan jackets to associate themselves with Manchester United and their Scottish manager (at the time...) - Tommy "The Doc" Docherty.
"The 'punctum' for me in this picture (and many of Daniel Meadows 1970s Bus portraits) is how I feel when I see the jackets, and haircuts, and imagine the smell of two young men who only bathed once a fortnight (if that).
I never had a jacket like that - my Mum wouldn't let me - and I would have been frightened if I walked down the street towards 'big kids' like them. They were the sort of lawless hooligans who would "kick yer 'ed in".
Now I see them and smile at how harmless, innocent, naive and comical they really were.
I also feel touched at the sight of the records - and remember that I often used to listen to music intently with friends. We would sit in each others' bedrooms and pore over every inch of the gatefold sleeves, devouring the lyrics and looking for mysterious messages scratched into the run-out groove.
People don't do that anymore.
I don't do that anymore.
But this picture transports me - like falling through a hole in the fabric of time and space, back to an age when things were simple - people ate meat and two veg everyday and knew their neighbours.
The punctum isn't necessarily a flaw, or a hole or a specific item - it best describes our emotional response to images (and perhaps people, music, places, tastes) - not something that everyone shares or understands - but matters indvidually to us.

Tuesday, March 11, 2008
Monday 17th CTS

We will look at what is known as the 'Directorial Mode'.
Photographers construct what they want to show - not record what is there. This is a fundamental concept that we looked at right back at the beginning of the course in 'Proof or Fiction' and we have returned to time and again, through the painterly aspirations of 19th century amateurs:
 the fakery of Robert Capa's falling soldier:
the utopia of The Family of Man:

the incisiveness of Robert Frank's Leica:

the hyper-reality of Martin Parr's fill-in flash:

- and Chris Killip's imaginative painter on the beach:

Monday's presentation will include Gregory Crewdson, Phillip Lorca di Corcia, David Hilliard, NIcholas Nixon and Sally Mann.
There will be some discussion, so you might want to check them out in advance.
Monday, March 10, 2008
Darkroom deadline
Tuesday 18th March - Lecture theatre 2 at 10.00am
Please bring your mounted BW prints - we will look at all the work and share knowledge.
If you have booked Studio 22 to shoot, please come along for ten minutes or so.
Please bring your mounted BW prints - we will look at all the work and share knowledge.
If you have booked Studio 22 to shoot, please come along for ten minutes or so.
Thursday, March 6, 2008
Tuesday 11th March
Mount cutting demonstration in Room 187 at 9.30am.
We will also discuss the allocation of individual tutorials - half hour slots on Tuesday mornings.
We will also discuss the allocation of individual tutorials - half hour slots on Tuesday mornings.
Monday, March 3, 2008
This week
Tuesday morning Graded Unit sessions in Studio 22 are bookable - there will be no taught class tomorrow morning.
Weds 9.30am Large Format demo - part 2
Weds afternoon: Studio 22 is bookable
Weds 9.30am Large Format demo - part 2
Weds afternoon: Studio 22 is bookable
Thursday, February 28, 2008
Scheimpflug
This is what happens if a 5x4 camera is set up in parallel:
Focused 1/3rd of the way in (the front of the white plate) and exposed at f11 - focus falls away towards the back

This is what happens when the scheimpflug principle is applied:
Focused on the front of the plate (again) and exposed at f11

There is much more depth of field, because the new line of focus runs through the new subject plane: from the front of the book up to the top of the bottle. Like this:

The camera will allow many other movements - one which is particularly useful is a reverse tilt - away from the subject, instead of sympathetic to it. The opposite of scheimpflug. Focused on the edge of the gilt bookbinding and exposed (once again at f11)

You will notice that in all the diagrams - the back of the camera is not upright. This causes the bottle and glass to lean outwards a little. This can be corrected by keeping the back vertical - as in the diagram below.

See the full misery of a technical explanation of the Scheimpflug principle for yourself
Sinar have useful info on their website

Focused 1/3rd of the way in (the front of the white plate) and exposed at f11 - focus falls away towards the back

This is what happens when the scheimpflug principle is applied:
Focused on the front of the plate (again) and exposed at f11

There is much more depth of field, because the new line of focus runs through the new subject plane: from the front of the book up to the top of the bottle. Like this:

The camera will allow many other movements - one which is particularly useful is a reverse tilt - away from the subject, instead of sympathetic to it. The opposite of scheimpflug. Focused on the edge of the gilt bookbinding and exposed (once again at f11)

You will notice that in all the diagrams - the back of the camera is not upright. This causes the bottle and glass to lean outwards a little. This can be corrected by keeping the back vertical - as in the diagram below.

See the full misery of a technical explanation of the Scheimpflug principle for yourself
Sinar have useful info on their website

Digital Infra-red
This is a minefield. Some digital cameras are more sensitive than others to IR frequencies. Chips are different, and so are the IR absorbing (protective) filters infront of the chip.
There are differences even between Canon models - and obviously the same goes for Nikon.
American nutters MaxMax will customise your camera for you by permanently removing the filter.
I suspect they look like this man...

...and I wouldn't let them near me. However...
There are lots of very helpful in-depth Digital infra-red tutorials on the web, written by men who spend every spare minute thinking about photography. They love to tinker with gadgets and techniques - and many of them run their own websites where they give all this knowledge and experience away - free - in exchange for a little love and affection in the form of a few kind words of thanks from complete strangers posted on their blogs and forums. Most of these men are married to women like these:

So, be kind and make someone happy today with an email.
Testing:
Here's a very crude test of IR sensitivity for digital cameras:
Put your camera in auto mode at ISO 100 with a wide aperture - no filter required at this point.
Point your IR telly remote into the lens from no more than 12" away.
Press any button on the remote while making the sound of a Star Wars light sabre and make an auto exposure.
Review the image on your camera screen:
If you see anything like this - you're doing really well:

If you see something like this - all is still not lost:

You need to do some work with levels and curves...

There are differences even between Canon models - and obviously the same goes for Nikon.
American nutters MaxMax will customise your camera for you by permanently removing the filter.
I suspect they look like this man...

...and I wouldn't let them near me. However...
There are lots of very helpful in-depth Digital infra-red tutorials on the web, written by men who spend every spare minute thinking about photography. They love to tinker with gadgets and techniques - and many of them run their own websites where they give all this knowledge and experience away - free - in exchange for a little love and affection in the form of a few kind words of thanks from complete strangers posted on their blogs and forums. Most of these men are married to women like these:

So, be kind and make someone happy today with an email.
Testing:
Here's a very crude test of IR sensitivity for digital cameras:
Put your camera in auto mode at ISO 100 with a wide aperture - no filter required at this point.
Point your IR telly remote into the lens from no more than 12" away.
Press any button on the remote while making the sound of a Star Wars light sabre and make an auto exposure.
Review the image on your camera screen:
If you see anything like this - you're doing really well:

If you see something like this - all is still not lost:

You need to do some work with levels and curves...

Infra-red

Recipe:
Kodak HIE 35mm - infra-red film (sensitive to 900nm)
Load (and unload) in total darkness
Wratten 25 (red) filter
ISO 400
Meter through the lens (i.e. NOT with a separate handmeter)
Bracket: +2 stops and -2 stops (infra-red is unpredictable)
Develop for 11mins in neat (undiluted) D76 at 20c (agitate normally)
Stop and Fix as usual
Print on Grade 4 or 5 paper

This is a starting point for your own experiments. Full IR filters give different effects.
Focus:
With wide angle lenses, shooting distant subjects with a small aperture, (such as landscape) focus will not be difficult.
With telephoto lenses, with closer subjects and a wider aperture (such as portraits) focus may need adjustment.
This lens has a white 'dot' next to the number '11' on the left of the barrel:

On this lens 'Normal' focus is 2.5m - but if you're shooting in IR you need to manually over-ride the focus to place 2.5m above the little white dot. Simple.
Older cameras are often better for these unusual processes - they don't have electronic film counters that can fog IR film, and have useful 'extras' like 'IR focus dots' - that disappeared in the 1990s when manufacturers began to cut costs on amateur cameras.
Monday, February 25, 2008
Constructed Image assignments
Research exisiting photographs of these subjects in your workbook.
Location: One image – minimum print size 10”x8”
Using a table-top set-up make an image to iIllustrate the word ‘Spring’ – for the front cover of The House of Fraser seasonal promotions catalogue. Do not add any words or logos
Natural light and/or artificial lighting can be used. Keep production notes in your workbook.
Studio: Two images required
5”x4” colour transparencies mounted in presentation sleeves
A prestigious hotel chain requires images to illustrate the following items:
Continental breakfast
Morning coffee
Light lunch
Afternoon tea
Pre-dinner drinks
Choose one from this list and make an image using 5x4 colour transparency film with deep depth of field - complete sharpness - running through the composition.
Choose another from this list and make an image using 5x4 colour transparency film with selectively placed, shallow depth of field drawing attention to a specific part of the composition.
Each picture MUST contain at least one translucent and/or reflective object within the composition. No people or hands.
Studio: One image – Exact print size A3
Make an image to represent the ‘city’
Location: Eight images – minimum print size 10”x8”
Using both infra-red film and digital cameras – make four infra-red images. Shoot four control shots of your IR subjects on conventional film/digital to illustrate the aesthetic differences between IR and panchromatic sensitivity
Assessments: One image to be presented on Wednesday 23rd April
All remaining images to be submitted on Wednesday 28th May
Location: One image – minimum print size 10”x8”
Using a table-top set-up make an image to iIllustrate the word ‘Spring’ – for the front cover of The House of Fraser seasonal promotions catalogue. Do not add any words or logos
Natural light and/or artificial lighting can be used. Keep production notes in your workbook.
Studio: Two images required
5”x4” colour transparencies mounted in presentation sleeves
A prestigious hotel chain requires images to illustrate the following items:
Continental breakfast
Morning coffee
Light lunch
Afternoon tea
Pre-dinner drinks
Choose one from this list and make an image using 5x4 colour transparency film with deep depth of field - complete sharpness - running through the composition.
Choose another from this list and make an image using 5x4 colour transparency film with selectively placed, shallow depth of field drawing attention to a specific part of the composition.
Each picture MUST contain at least one translucent and/or reflective object within the composition. No people or hands.
Studio: One image – Exact print size A3
Make an image to represent the ‘city’
Location: Eight images – minimum print size 10”x8”
Using both infra-red film and digital cameras – make four infra-red images. Shoot four control shots of your IR subjects on conventional film/digital to illustrate the aesthetic differences between IR and panchromatic sensitivity
Assessments: One image to be presented on Wednesday 23rd April
All remaining images to be submitted on Wednesday 28th May
Tuesday, February 19, 2008
Bookmaking

Your first attempt will be messy, sticky and probably a bit of a disappointment - like everyones' first time - except this won't be over as quickly. So have a practice. Make a small book to familiarise yourself with the cutting, scoring, folding and glueing issues that you'll encounter.
Cut your paper to size, and factor-in an extra centimeter to score and fold over (we'll call this bit the 'tang')

Japanese folding book:

The idea is that the tangs allow the pages to be joined, and provide a 'spacer' to help the book sit flat when the photographs are added. The book can be anchored together at one side with ribbon or tape to form a spine, allowing the book to open conventionally. The tapes or ribbons can be released to allow the book to extend as a long 'concertina', showing all the images at once.
PVA 'School' glue is ideal for sticking the book together, but use sparingly.

Conventional book:

This method fixes the spine of the book on one side, but (again) the 'tangs' provide spacers to let the book lie flat when the photographs are added.
For those who didn't grow up with Blue Peter or don't have an adult to help you, Photobox.co.uk will make a book for you from your uploaded images - similar to how flickr works

As with anything cheap, easy and quick, everyone and his dog is likely to start doing it, so remember that hand-made means unique.
Silverprint portfolio boxes and actetate sleeves are easily found through the link on the right.
Subscribe to:
Posts (Atom)